
Welcome to HealthLiteracyCopilot
Follow this step-by-step guide to get your organization up and running. From your welcome email to assessing, revising, and translating health content — we'll walk you through every step.
Your HealthLiteracyCopilot URLs
HealthLiteracyCopilot has two portals — the Client Portal for organization management and the User Portal for working with documents.
Basic / Standard / Pro Tiers
Client Portal
client.healthliteracycopilot.aiUser Portal
user.healthliteracycopilot.aiEnterprise Tier
Enterprise organizations get a dedicated subdomain. For example, if your subdomain is hospitalabc:
Client Portal
hospitalabc.client.healthliteracycopilot.aiUser Portal
hospitalabc.user.healthliteracycopilot.aiWho Does What?
Client Owner
The designated administrator for your organization.
Responsible for Steps 1–2: account setup, managing users and departments via the Client Portal.
All Team Members
Everyone who will work with documents.
Responsible for Steps 3–8: sign in to the User Portal, upload documents, and assess, revise, translate, and export content.
Getting Started
Account Setup
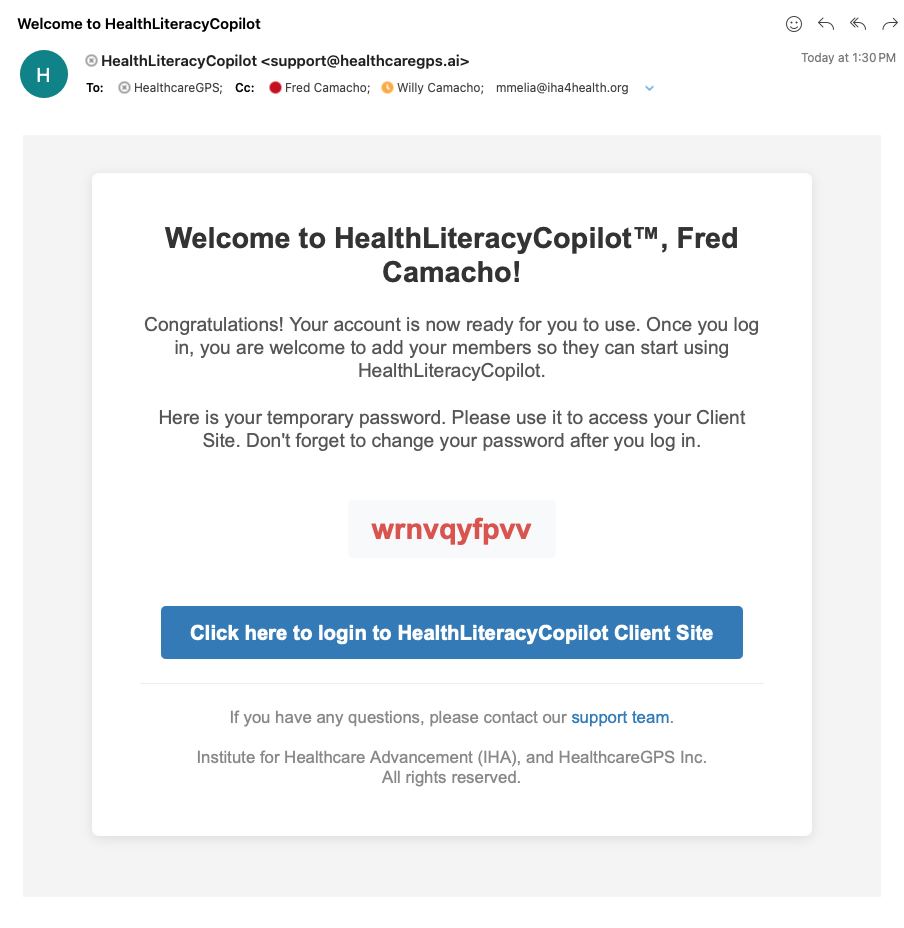
Once your organization is set up, the designated Client Owner will receive a welcome email with a temporary password and a link to the Client Portal (client.healthliteracycopilot.ai or <your-subdomain>.client.healthliteracycopilot.ai for Enterprise).
Check Your Welcome Email
Look for a welcome email from support@healthcaregps.ai in your inbox. It contains your temporary password and a direct link to sign in to the Client Portal. Be sure to check your spam or junk folder if you don't see it.
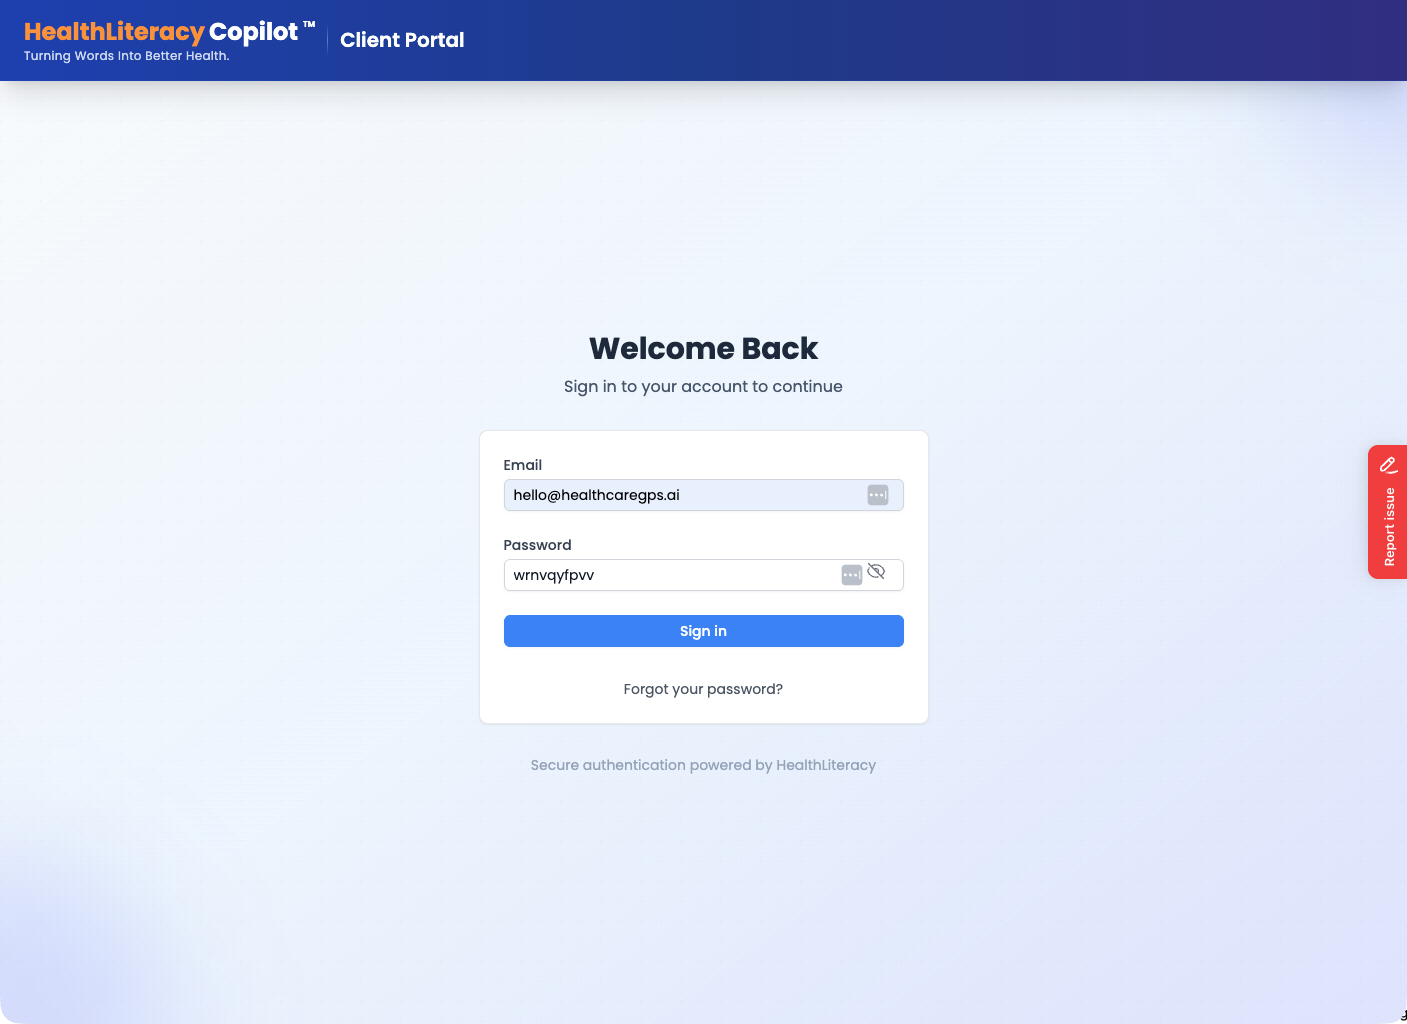
Sign In to the Client Portal
Click the link in your welcome email to open the Client Portal login page. Enter your email address and the temporary password provided.
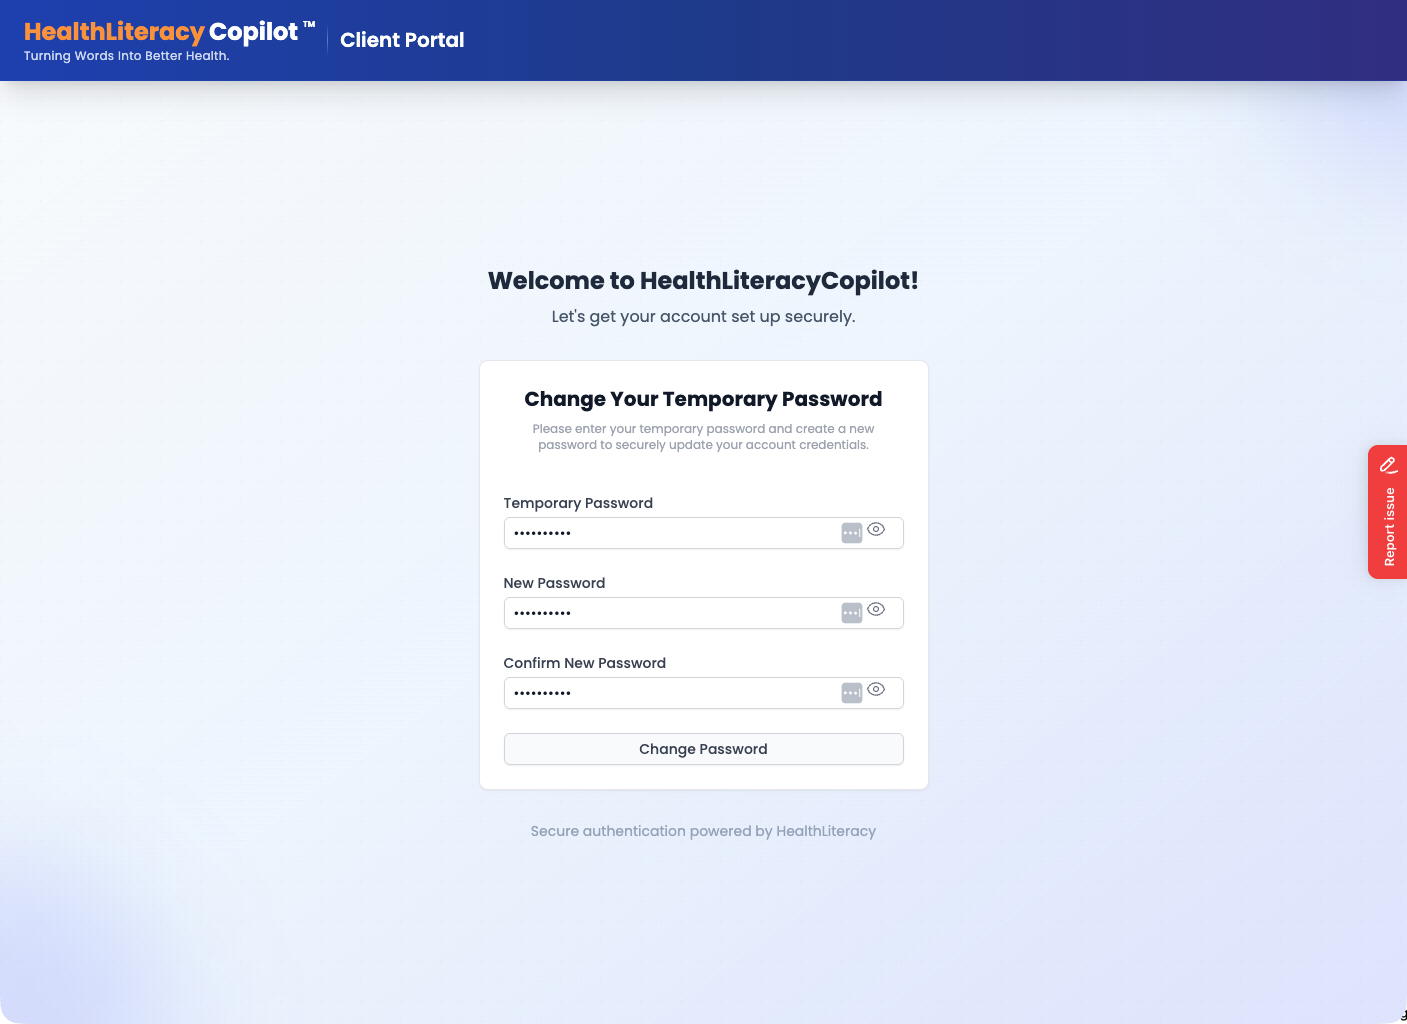
Change Your Temporary Password
On your first login, you'll be prompted to create a new secure password. Enter your temporary password and choose a new one.
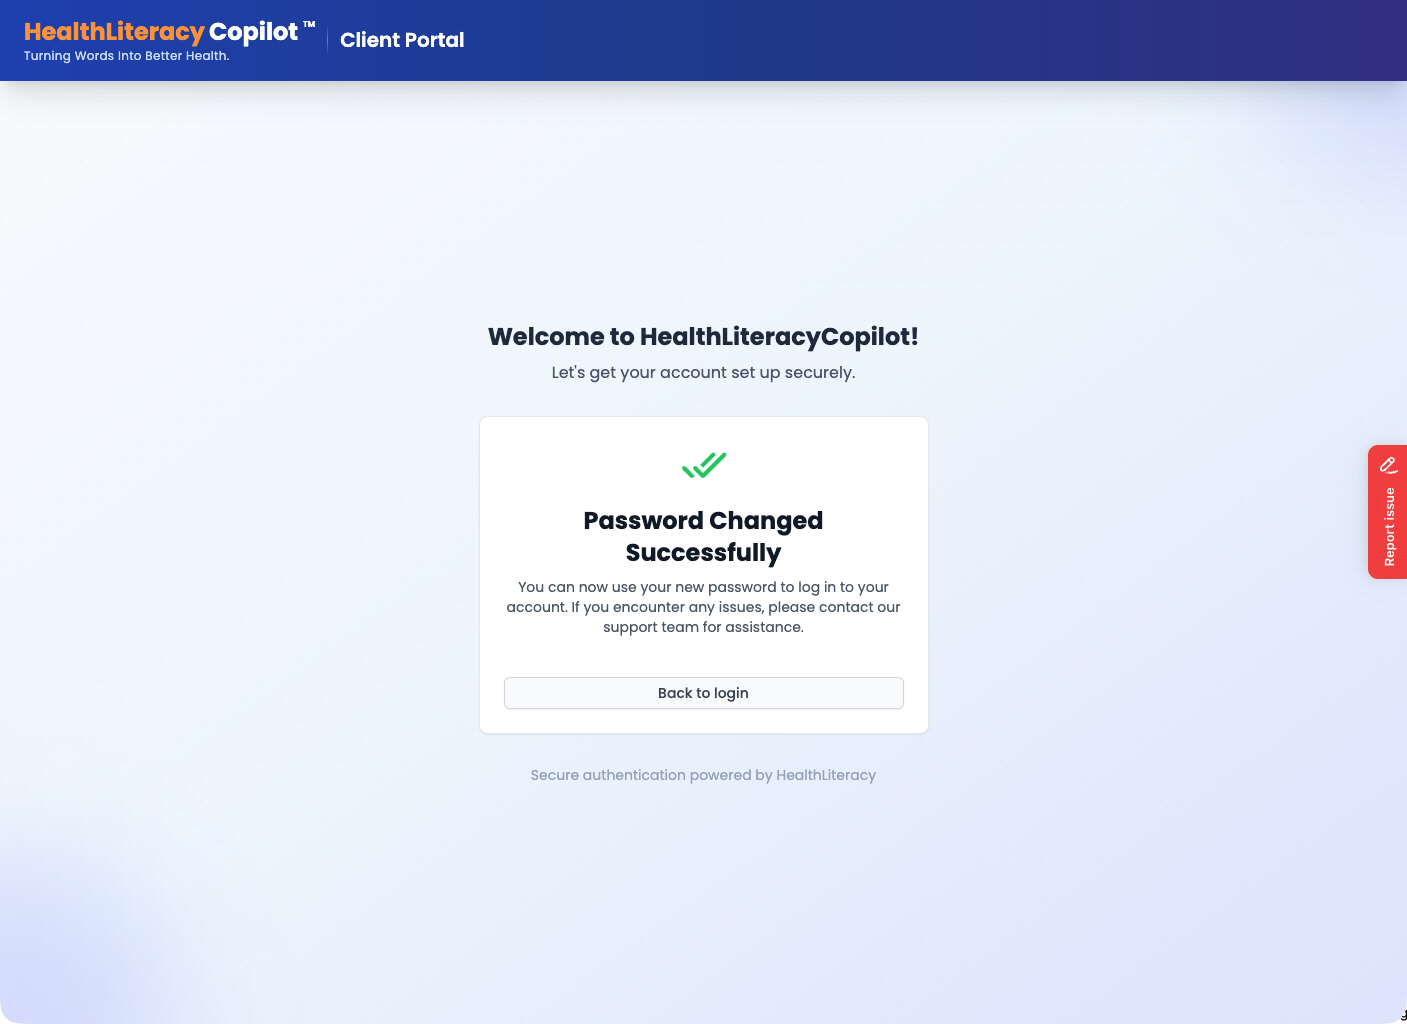
Password Updated Successfully
Once your password is changed, click "Back to login" to sign in with your new credentials.
Client Portal
Manage Your Organization
The Client Portal is where you manage your organization's team. As the Client Owner, you can add departments, invite team members, and assign roles. You can always access it at client.healthliteracycopilot.ai (or your Enterprise subdomain URL).
Organization Management Dashboard
After signing in, you'll land on the Organization Management page. Here you can see all users, create departments, and manage settings for your organization.
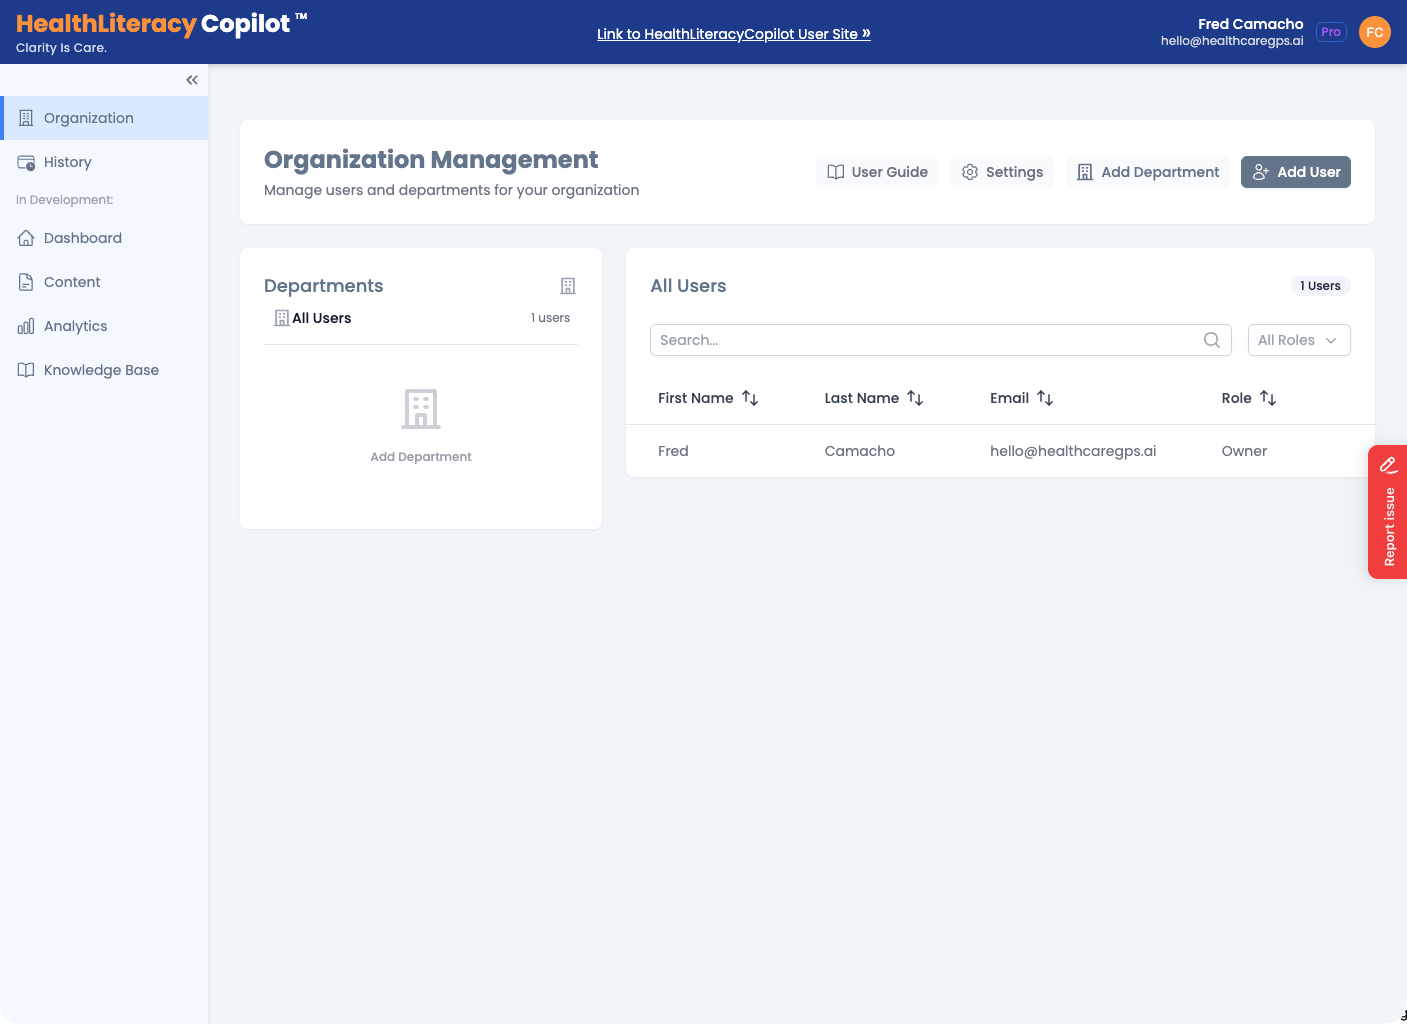
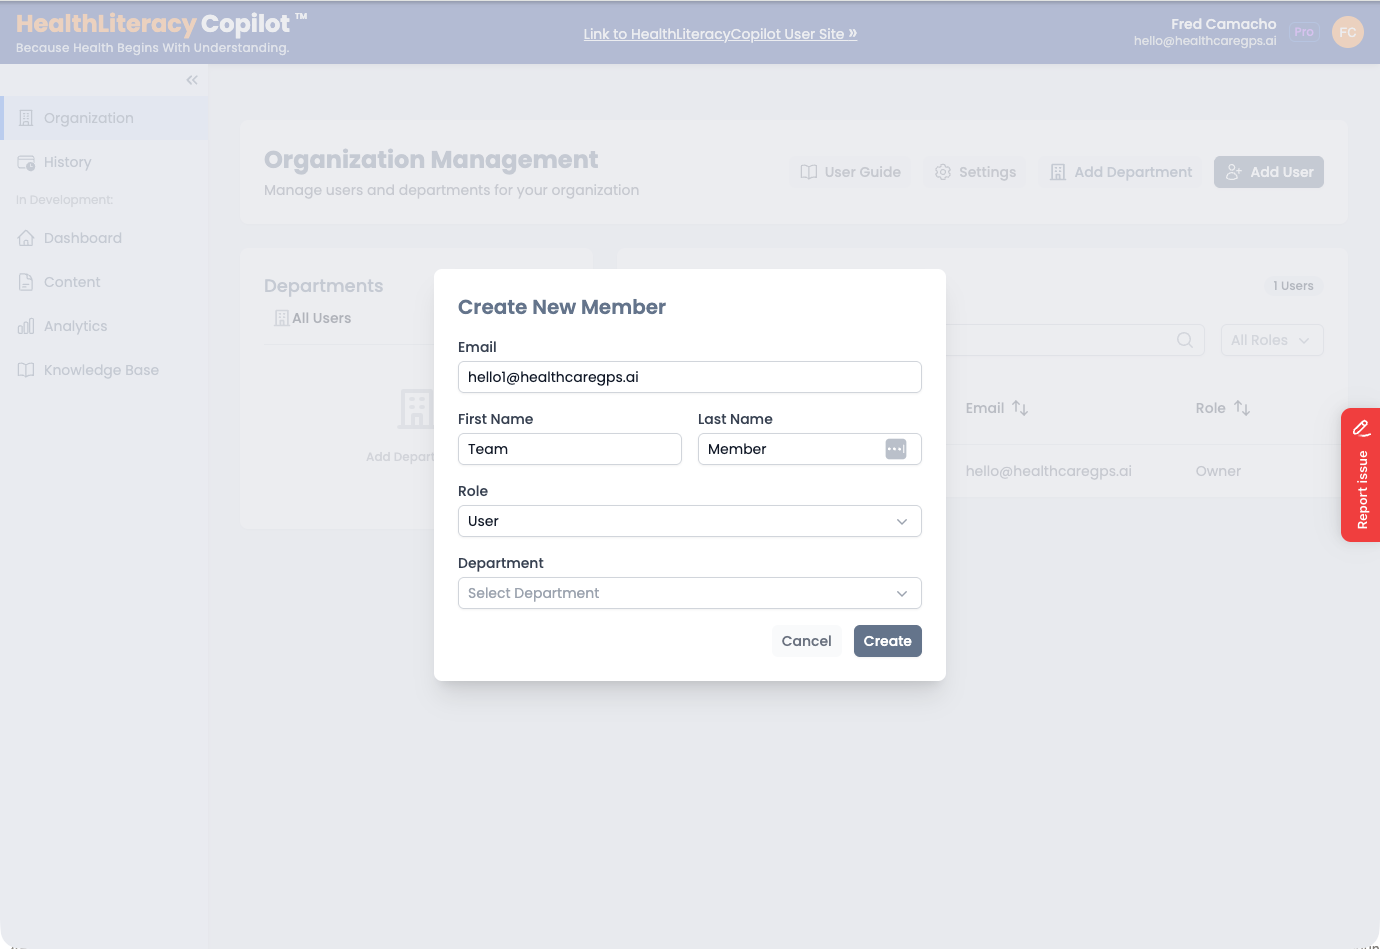
Add Team Members
Click "Add User" to invite team members. Enter their email, name, role, and optionally assign them to a department. They'll receive their own welcome email and will follow the same sign-in and password change steps described in Step 1.
Switching to the User Portal
Now that your organization is set up in the Client Portal, it's time to switch to the User Portal — this is where all team members upload, assess, revise, and translate documents.
User Portal
The User Portal
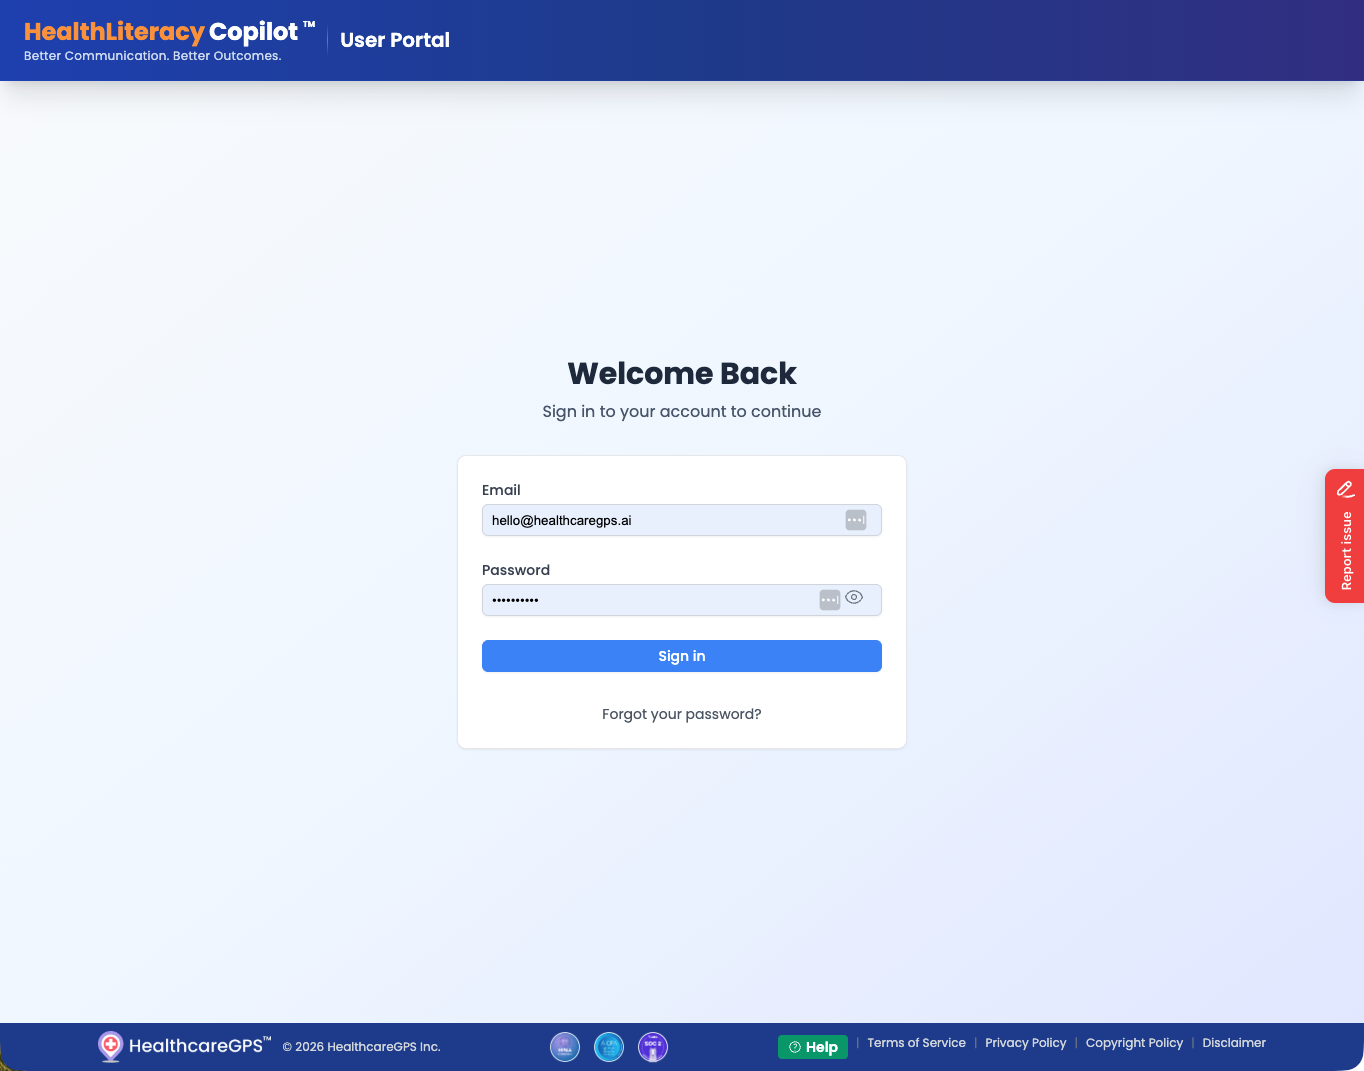
The User Portal is where the real work happens. Access it at user.healthliteracycopilot.ai (or <your-subdomain>.user.healthliteracycopilot.ai for Enterprise).
Sign In to the User Portal
Team members who were added by the Client Owner will receive their own welcome email. Use your credentials to sign in to the User Portal.
Explore Your Dashboard
Your dashboard gives you a complete overview of your activity, quick-start actions, subscription usage, and recent documents. Notice the "Getting Started" button at the top of the left sidebar — click it anytime for an in-app guided walkthrough.
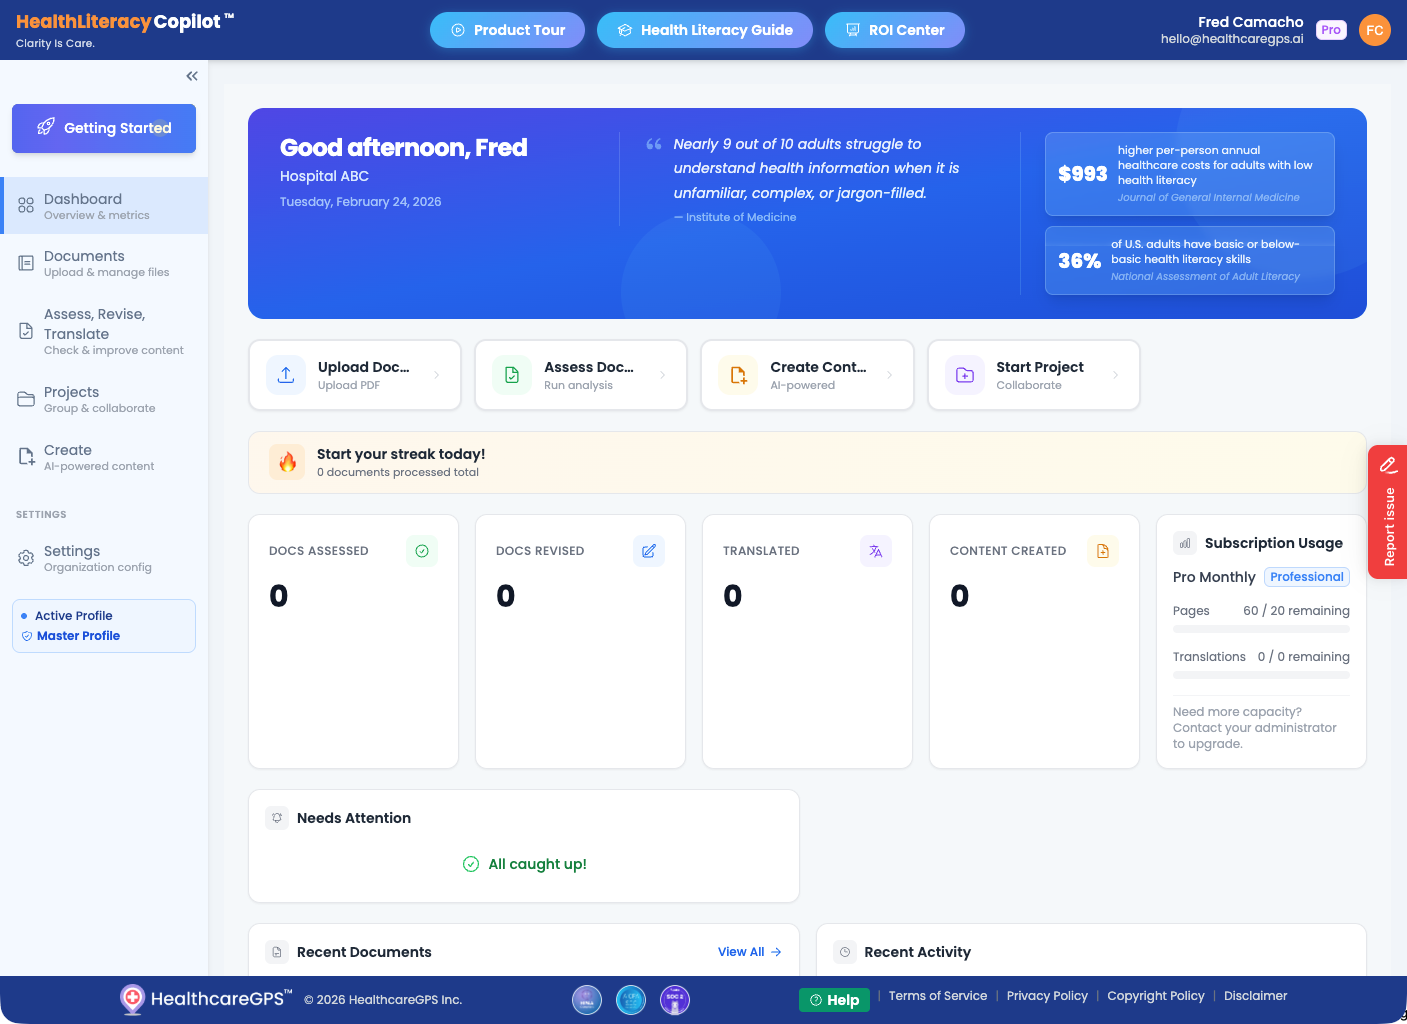
Quick Actions
Upload documents, run assessments, create content, and start projects right from the dashboard.
Activity Tracking
See your assessed, revised, translated, and created document counts at a glance.
Subscription Usage
Monitor your remaining pages and translation credits for the current billing period.
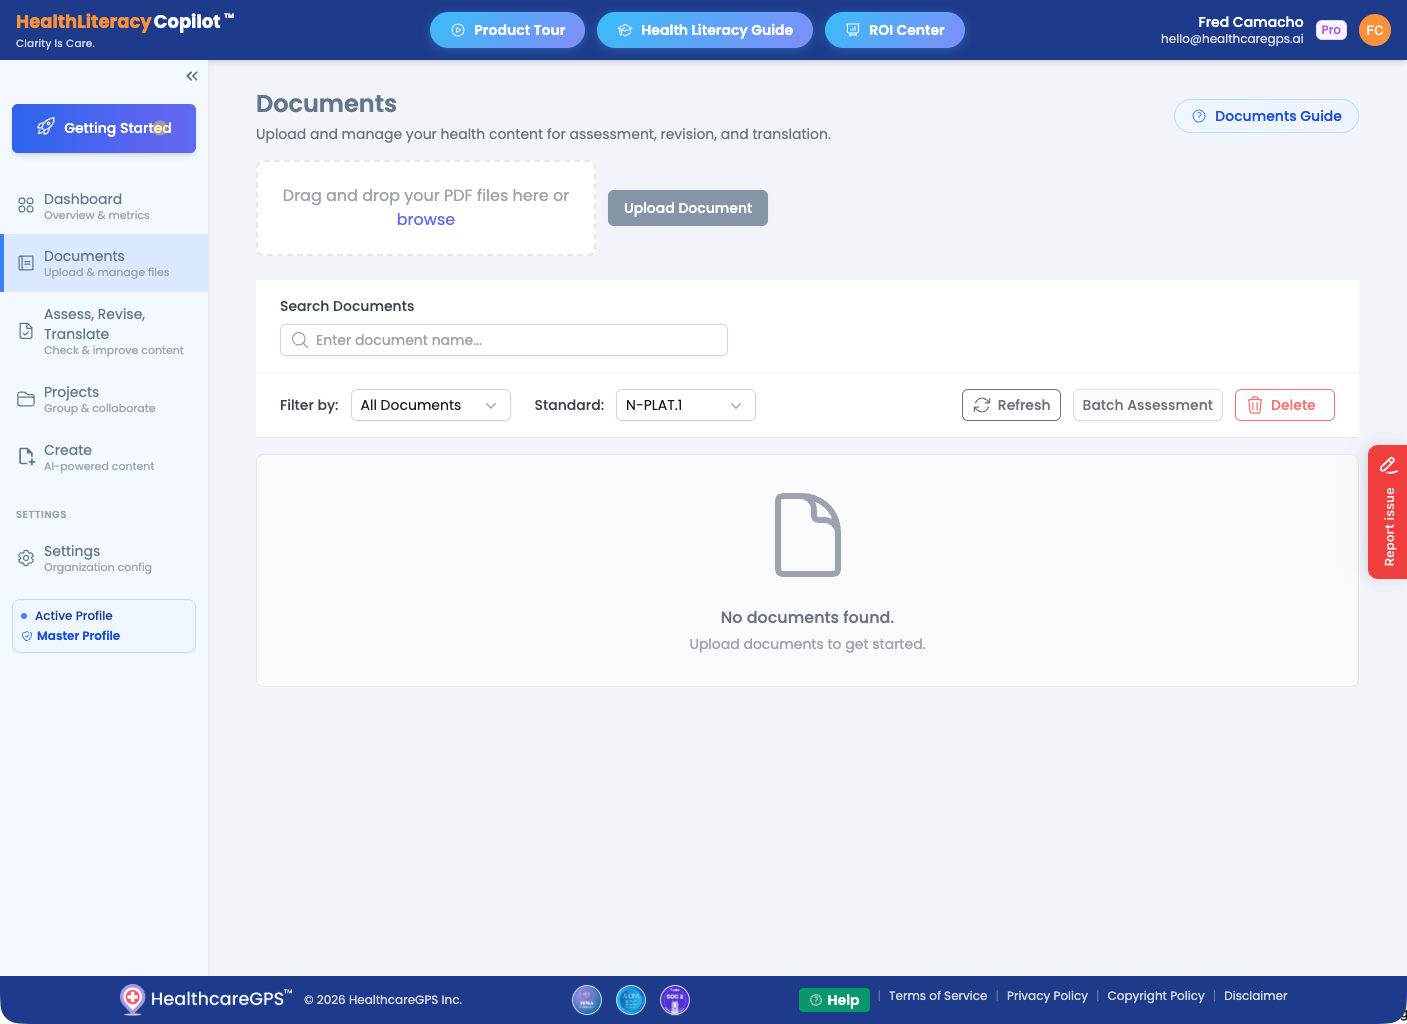
Documents
Upload Your Documents
Navigate to the Documents page to upload your health content for assessment, revision, and translation. Drag and drop PDF files or click "browse" to select them.
Documents Page
The Documents page shows all your uploaded files. Use the drag-and-drop zone or the "Upload Document" button to add new PDF files.
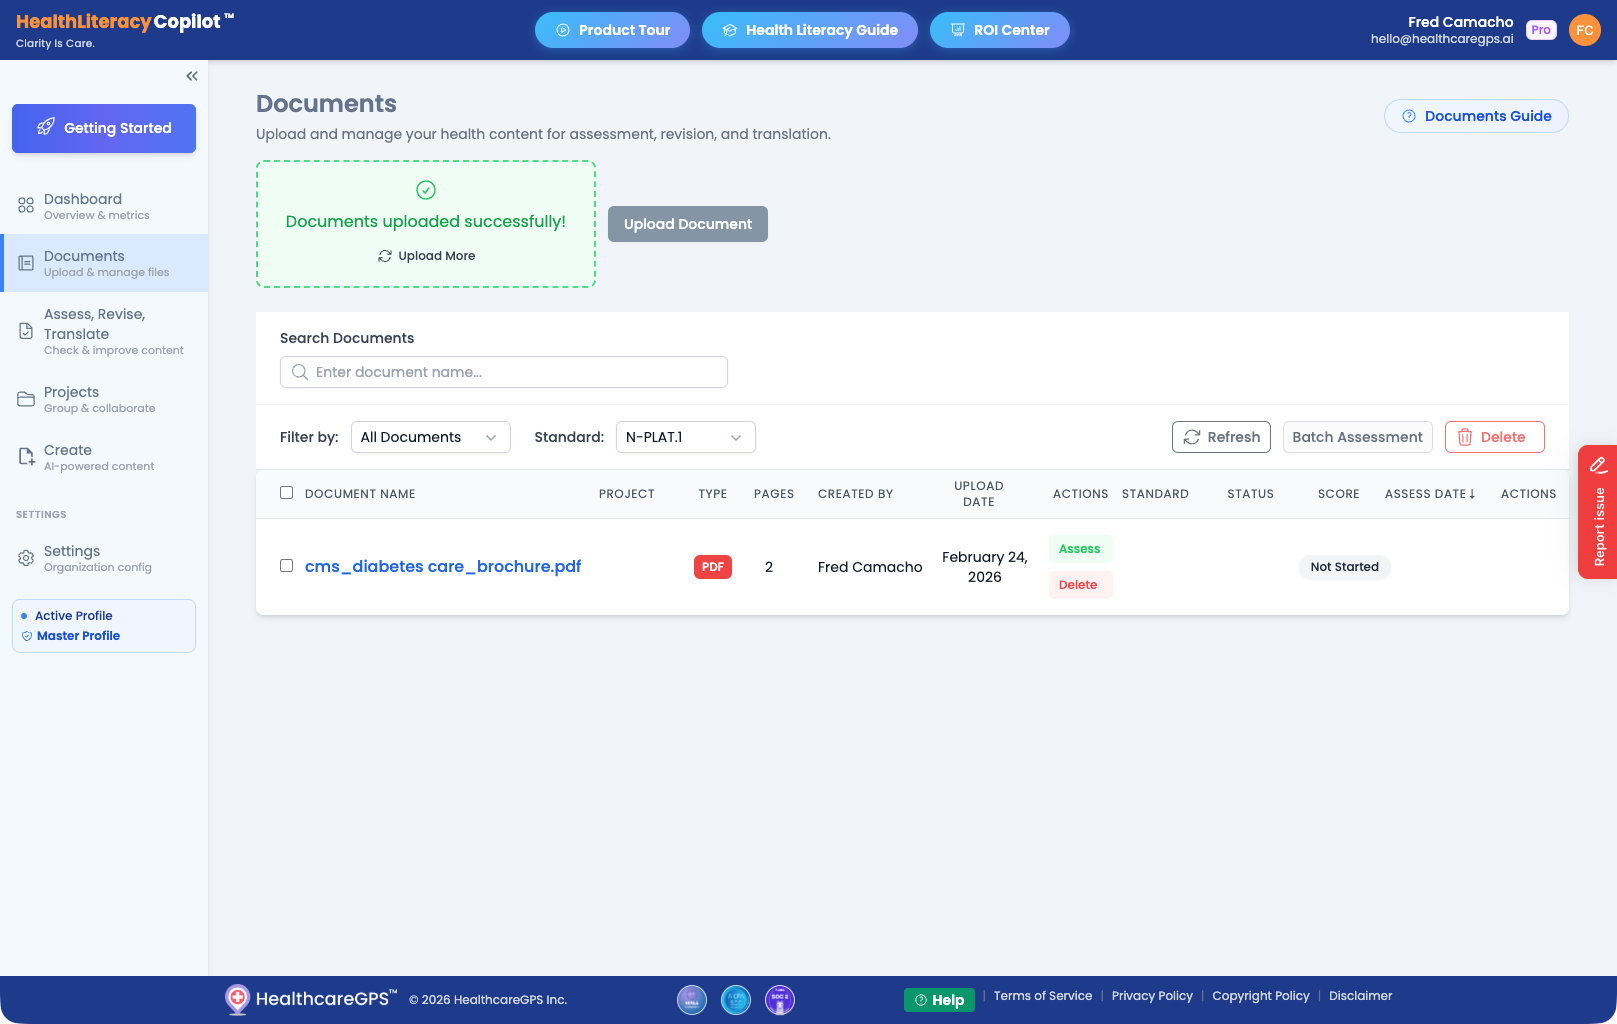
Document Uploaded Successfully
After uploading, your document appears in the list with details like file type, page count, and status. Click "Assess" to begin evaluating its health literacy.
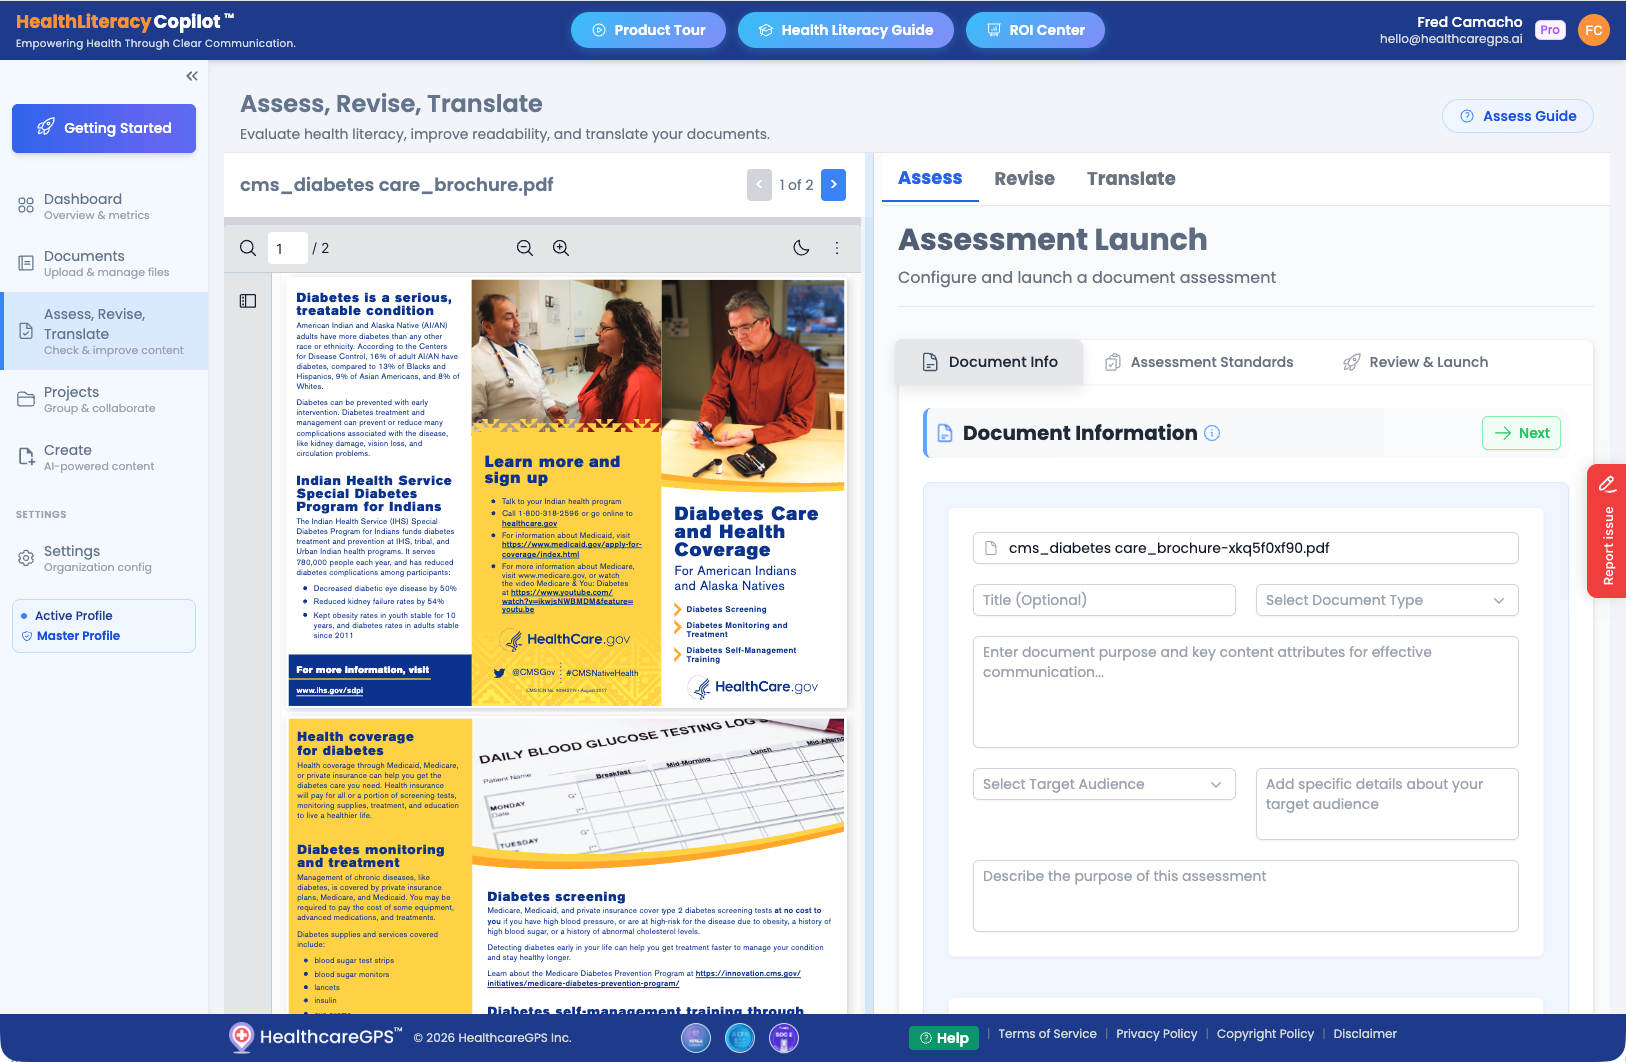
Assess
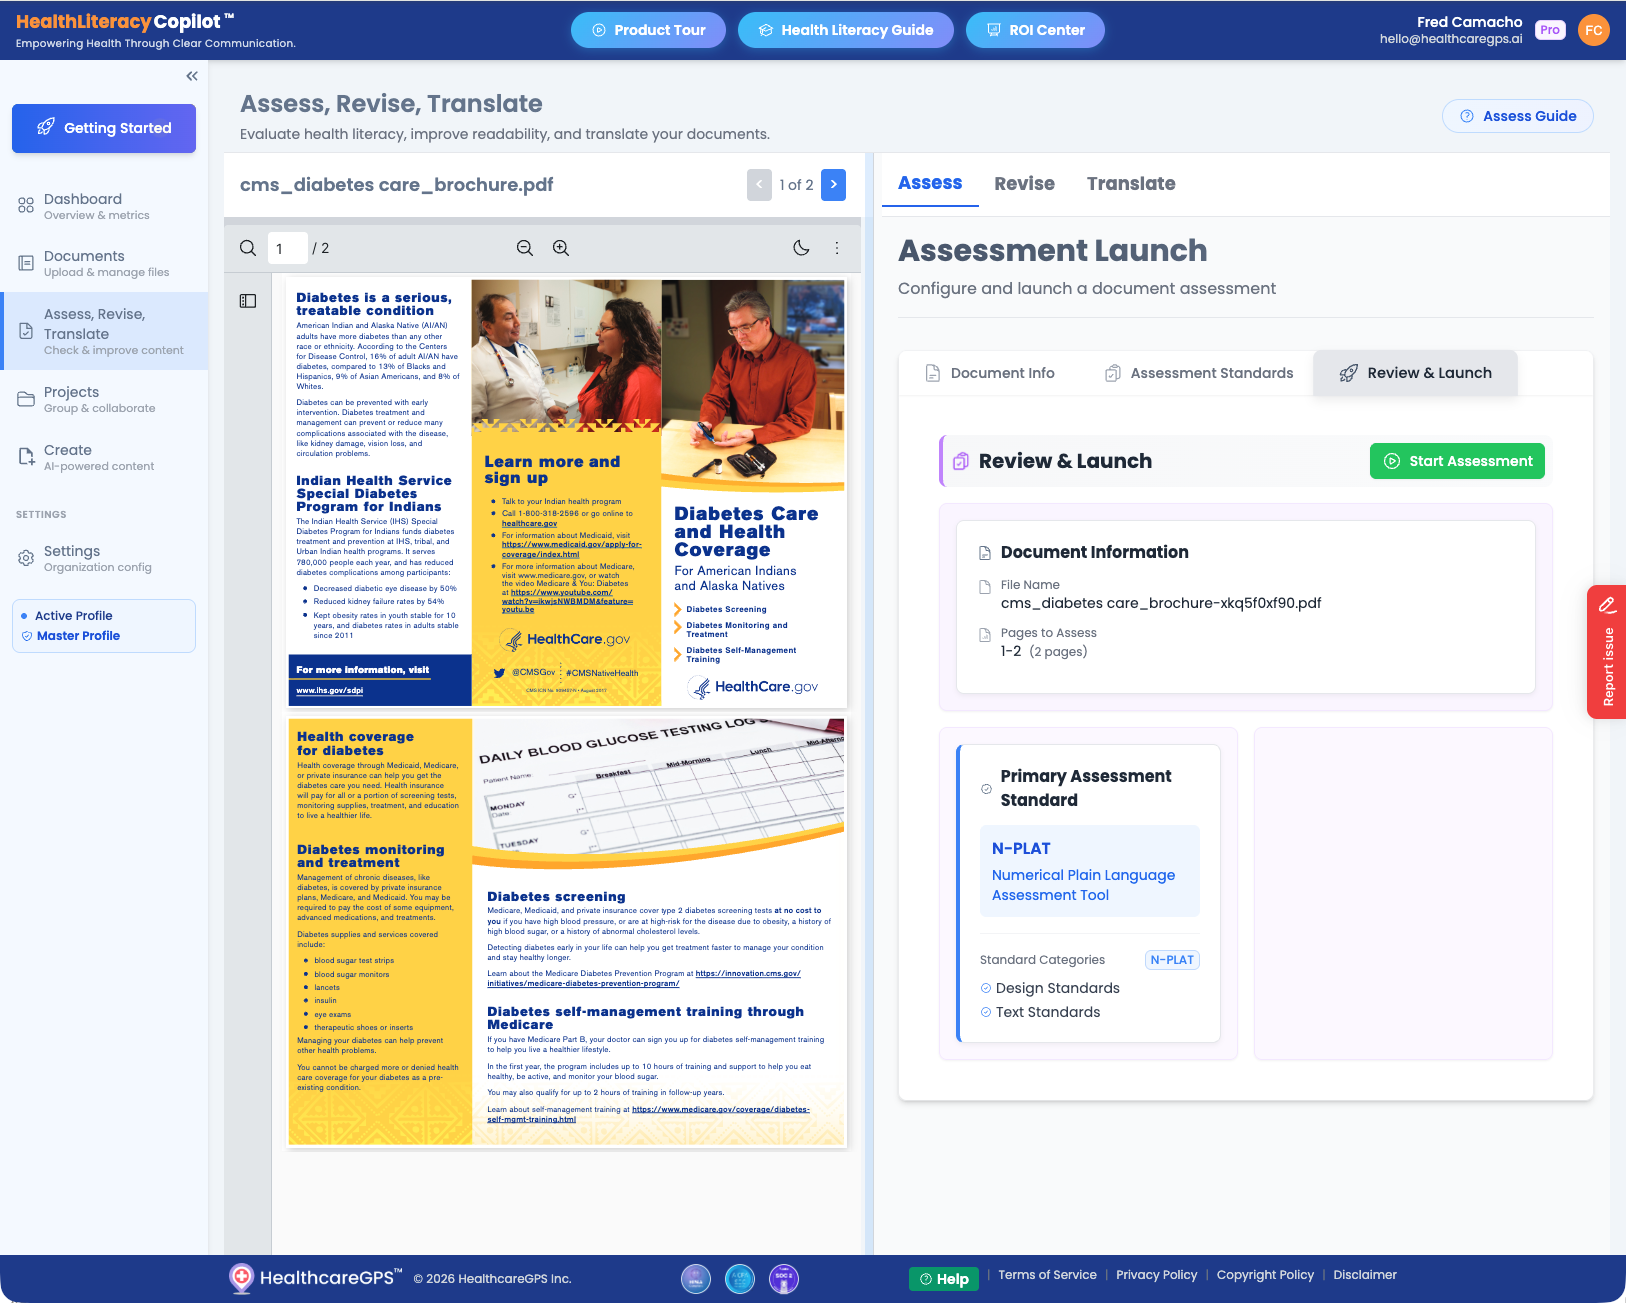
Assess Your Content
Steps 5, 6, and 7 all happen on the same screen
When you open a document for processing, you'll see three tabs — Assess, Revise, and Translate — at the top of the page. You work through them left to right. No need to navigate elsewhere.
The assessment process evaluates your document against health literacy standards. You'll walk through three steps: Document Info, Assessment Standards, and Review & Launch.
Step 1: Document Information
Provide details about your document — title, content type, purpose, and target audience. This context helps the AI generate more relevant and accurate assessments.
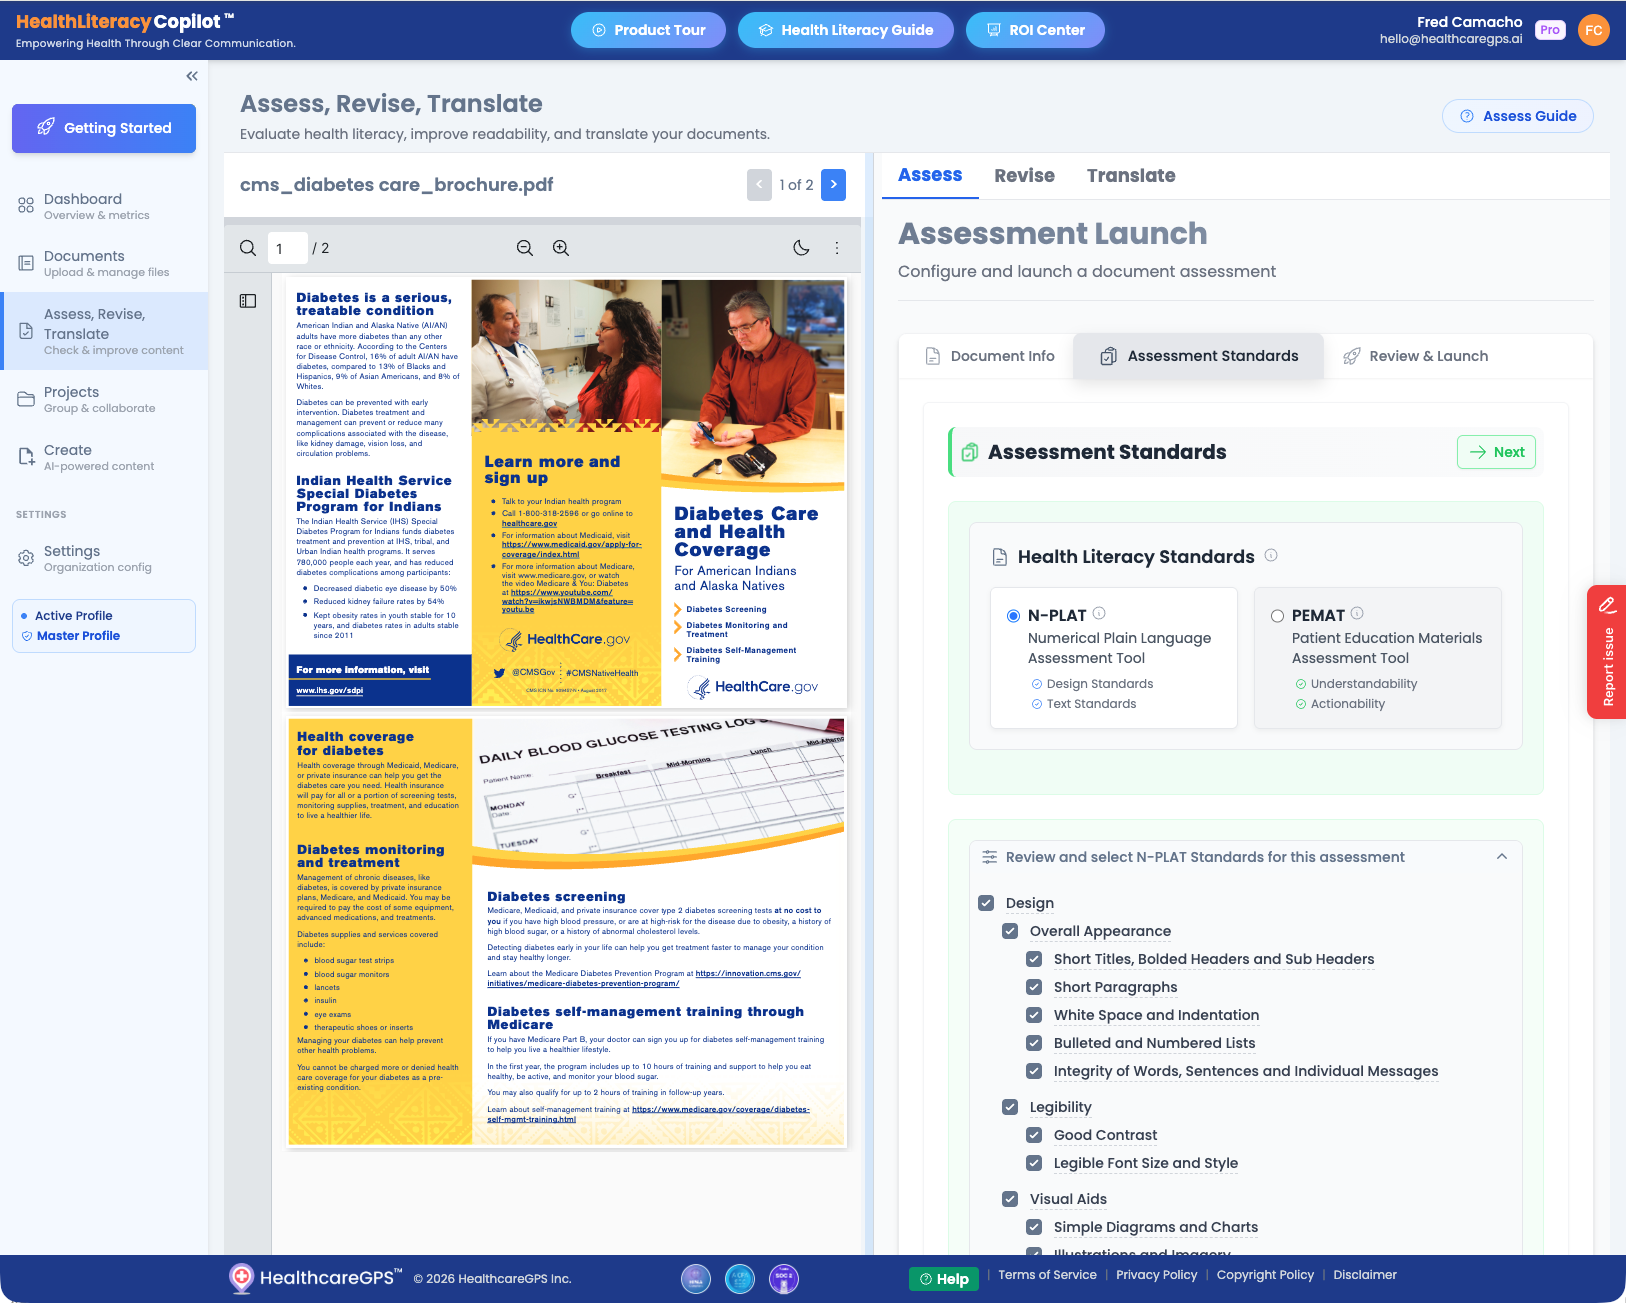
Step 2: Assessment Standards
Choose your health literacy standard. N-PLAT (Numerical Plain Language Assessment Tool) evaluates design, legibility, and visual aids. PEMAT (Patient Education Materials Assessment Tool) focuses on understandability and actionability. Select the criteria relevant to your content.
Step 3: Review & Launch
Review your document details and selected standard, then click "Start Assessment" to begin the AI-powered evaluation.
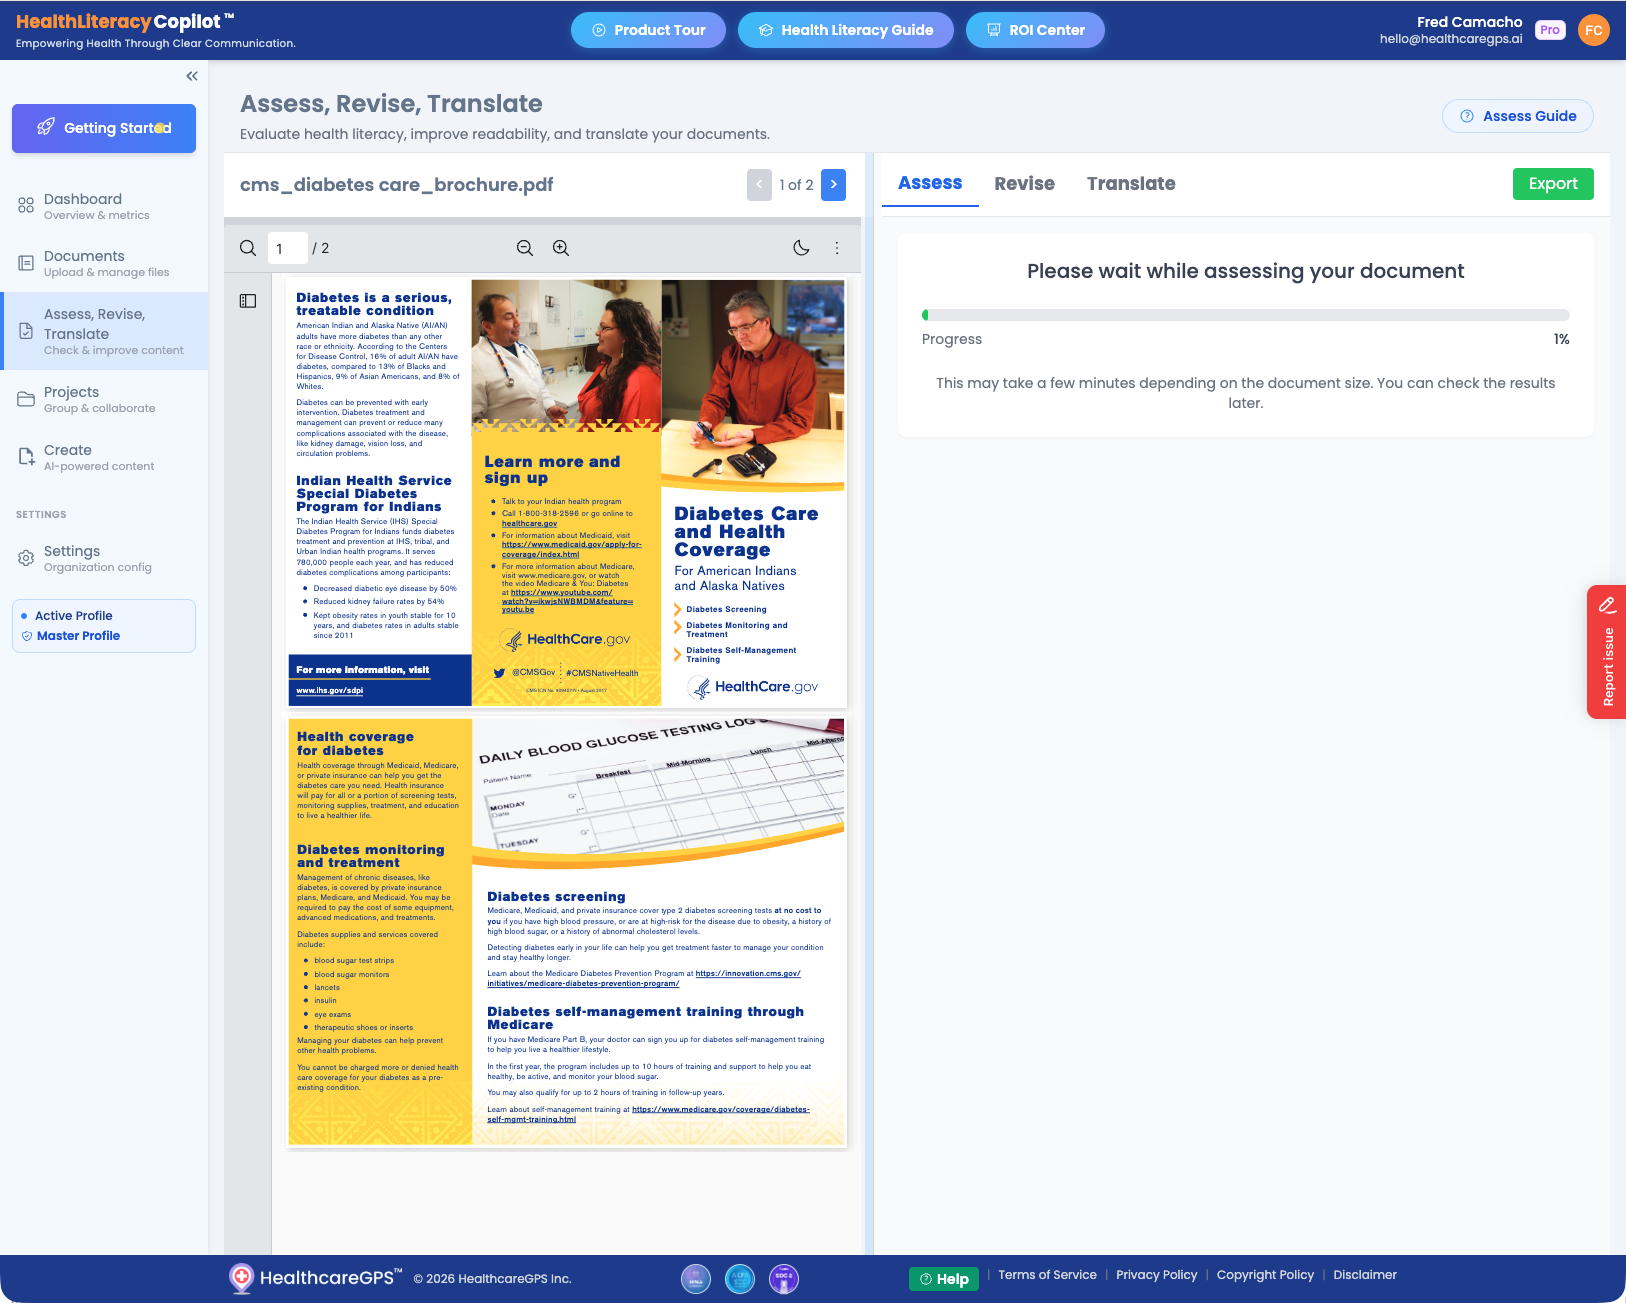
Assessment In Progress
The AI analyzes your document page by page. You'll see a progress bar — this typically takes a few minutes depending on document size. You can check back later if needed.
Revise
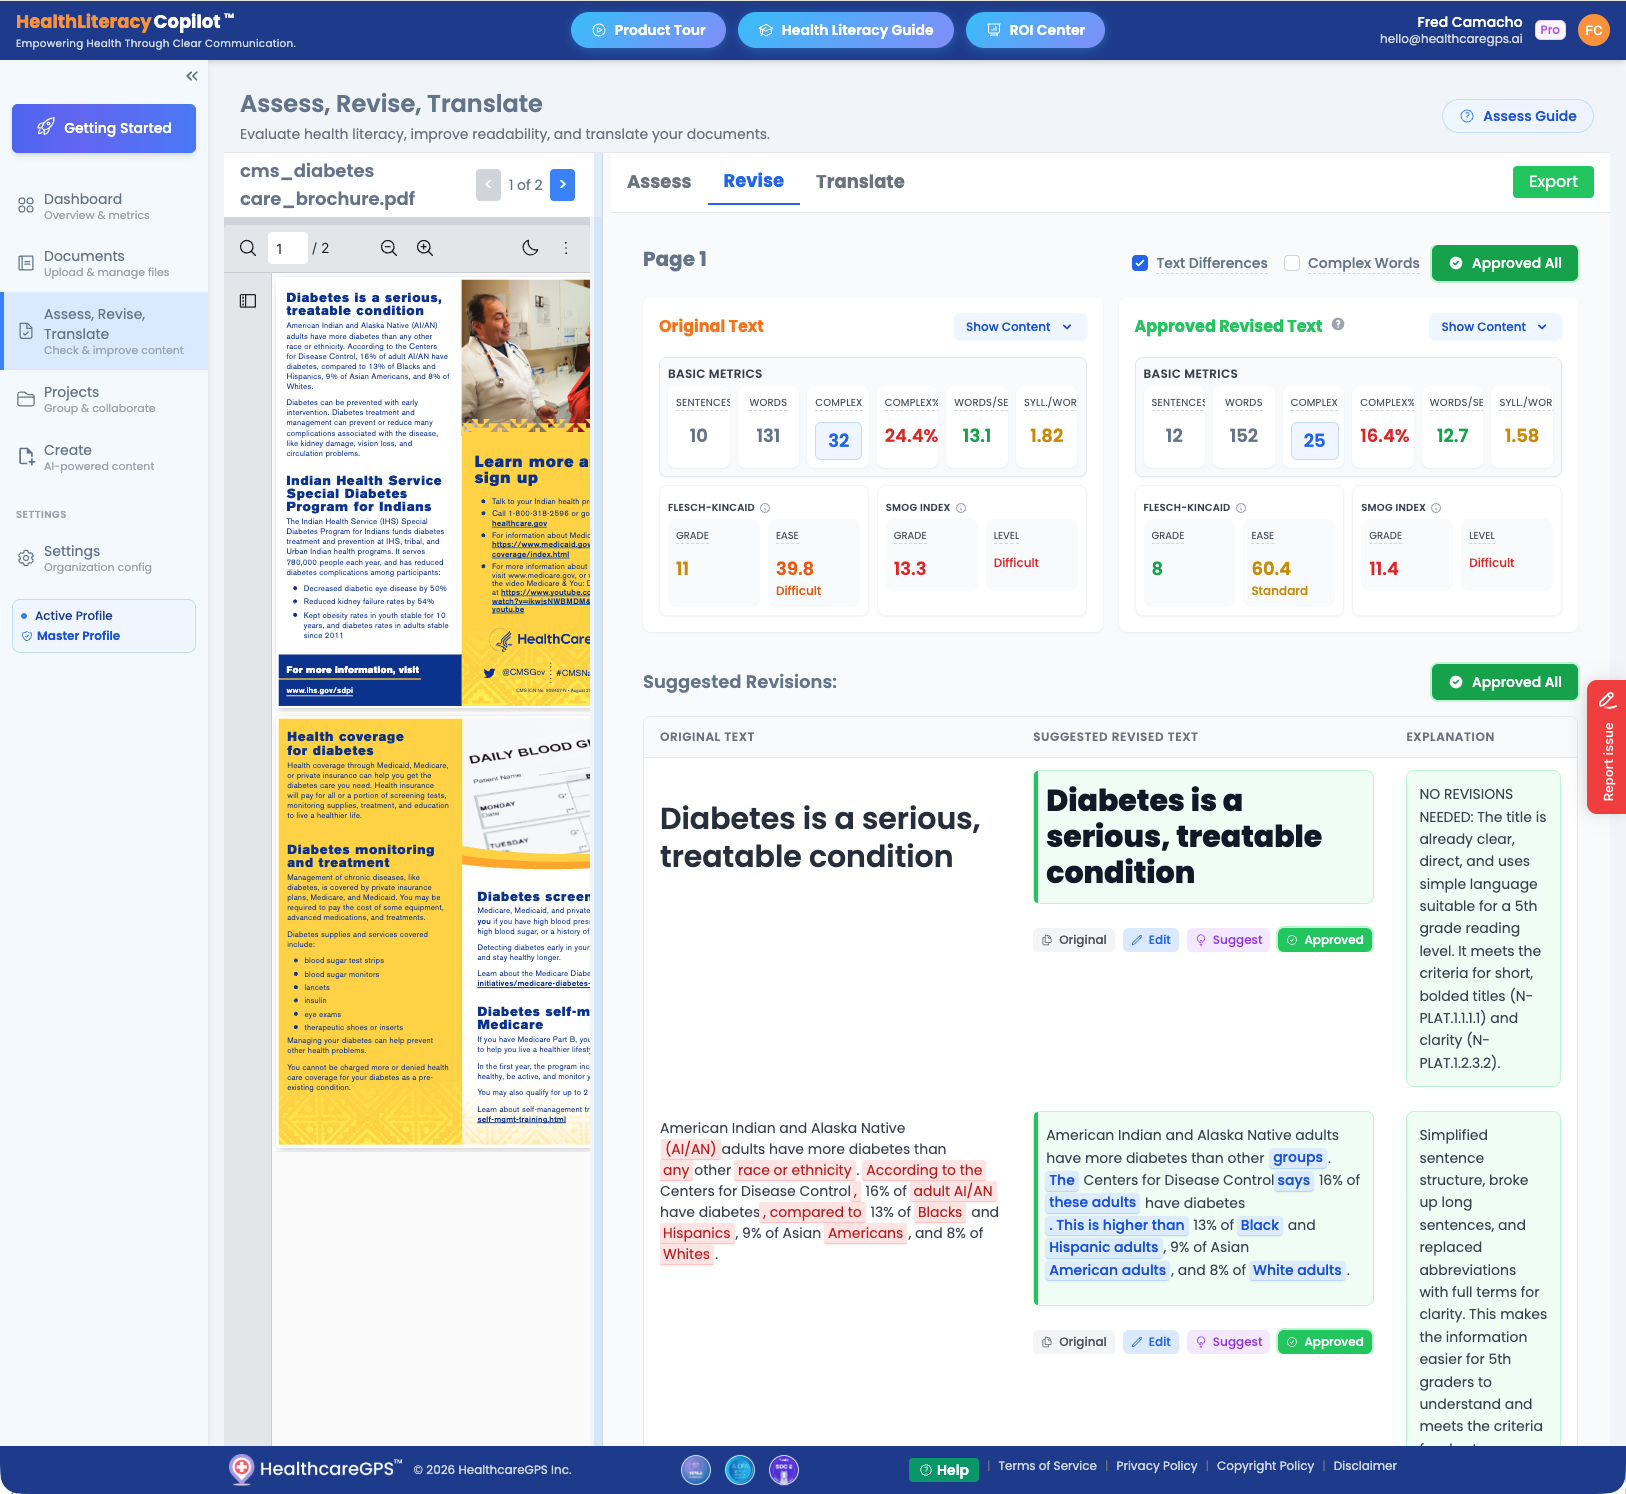
Revise Your Content
Once the assessment is complete, the Revise tab shows AI-generated suggestions to improve your content's readability and health literacy compliance. You'll see a side-by-side comparison of the original text and suggested revisions.
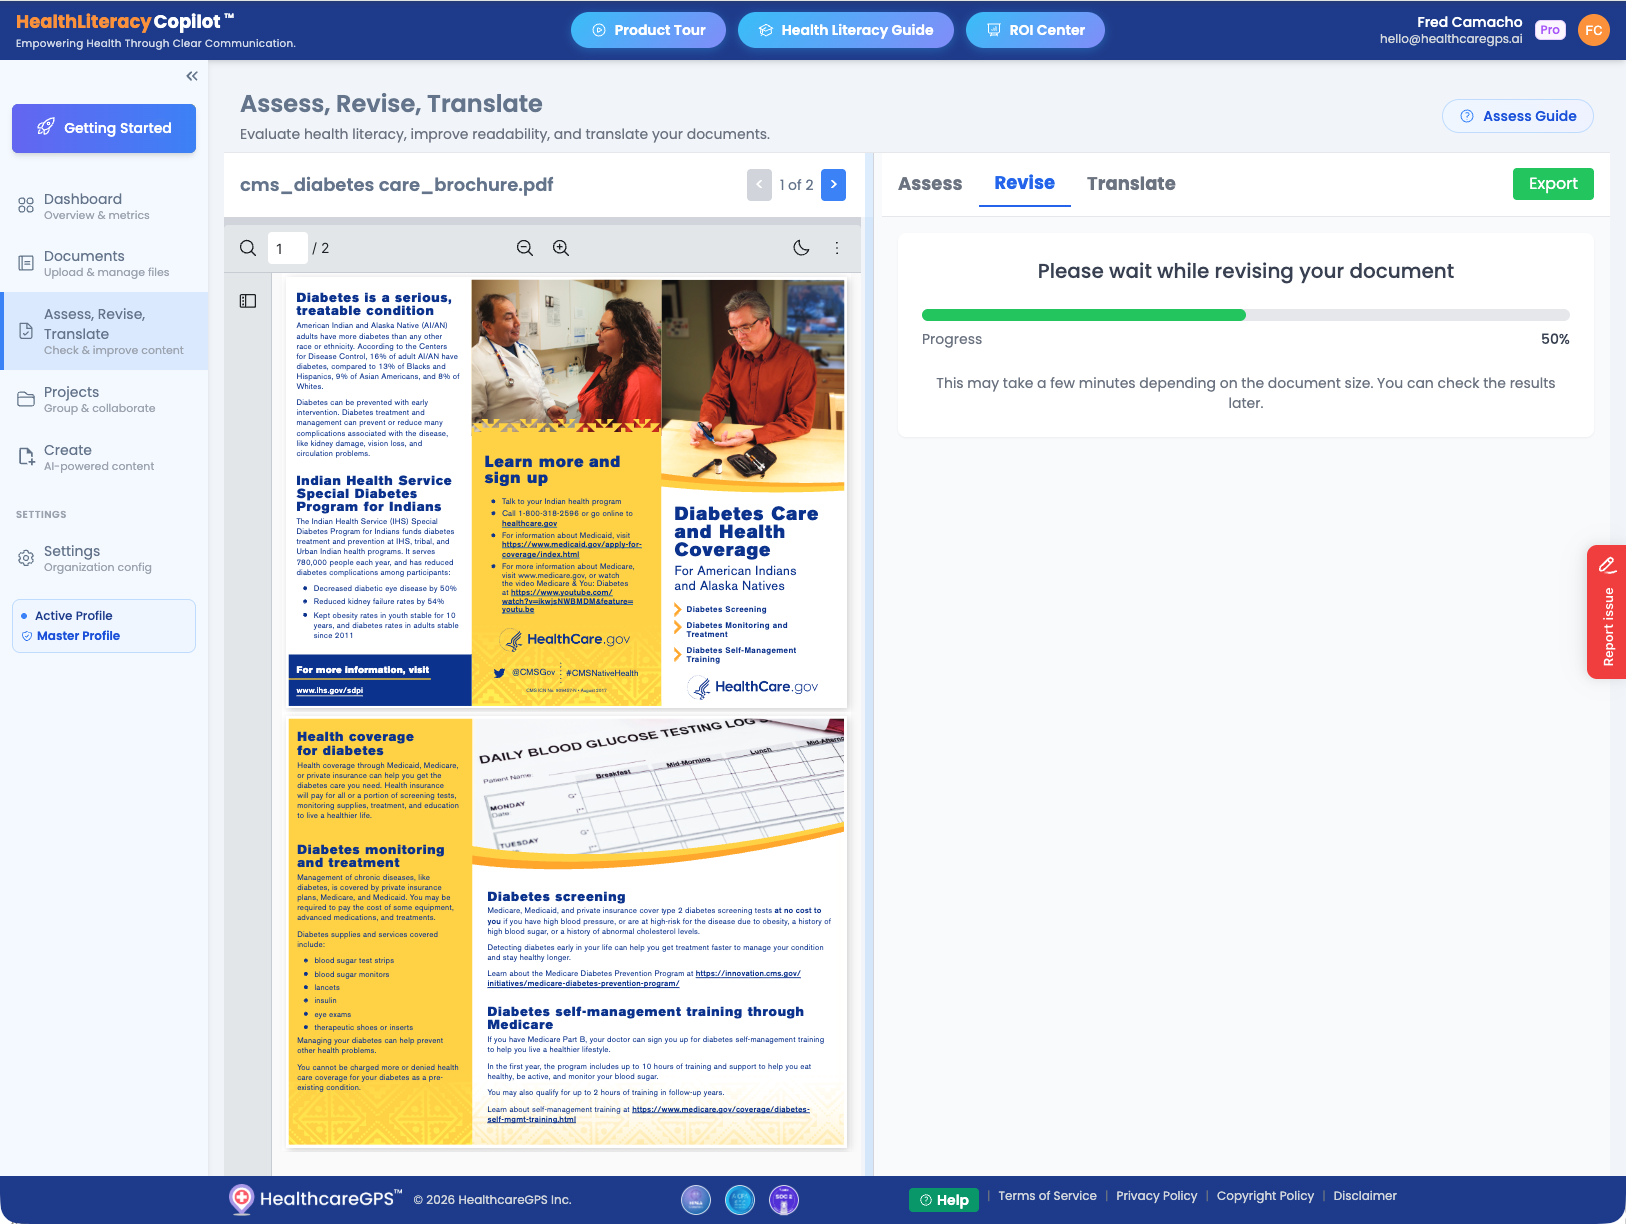
Revision In Progress
The AI generates plain-language revisions for each section of your document. This runs automatically after assessment.
Review Suggested Revisions
View the Original Text alongside the Suggested Revised Text with detailed metrics (readability scores, word count, complexity). Each revision includes an Explanation of why changes were made. You can approve, edit, or request new suggestions for each section.
Translate
Translate Your Content
The Translate tab lets you translate your approved revised text into multiple languages including Spanish, Chinese, Tagalog, Vietnamese, Arabic, and more. Each translation includes explanations of cultural and linguistic adaptations.
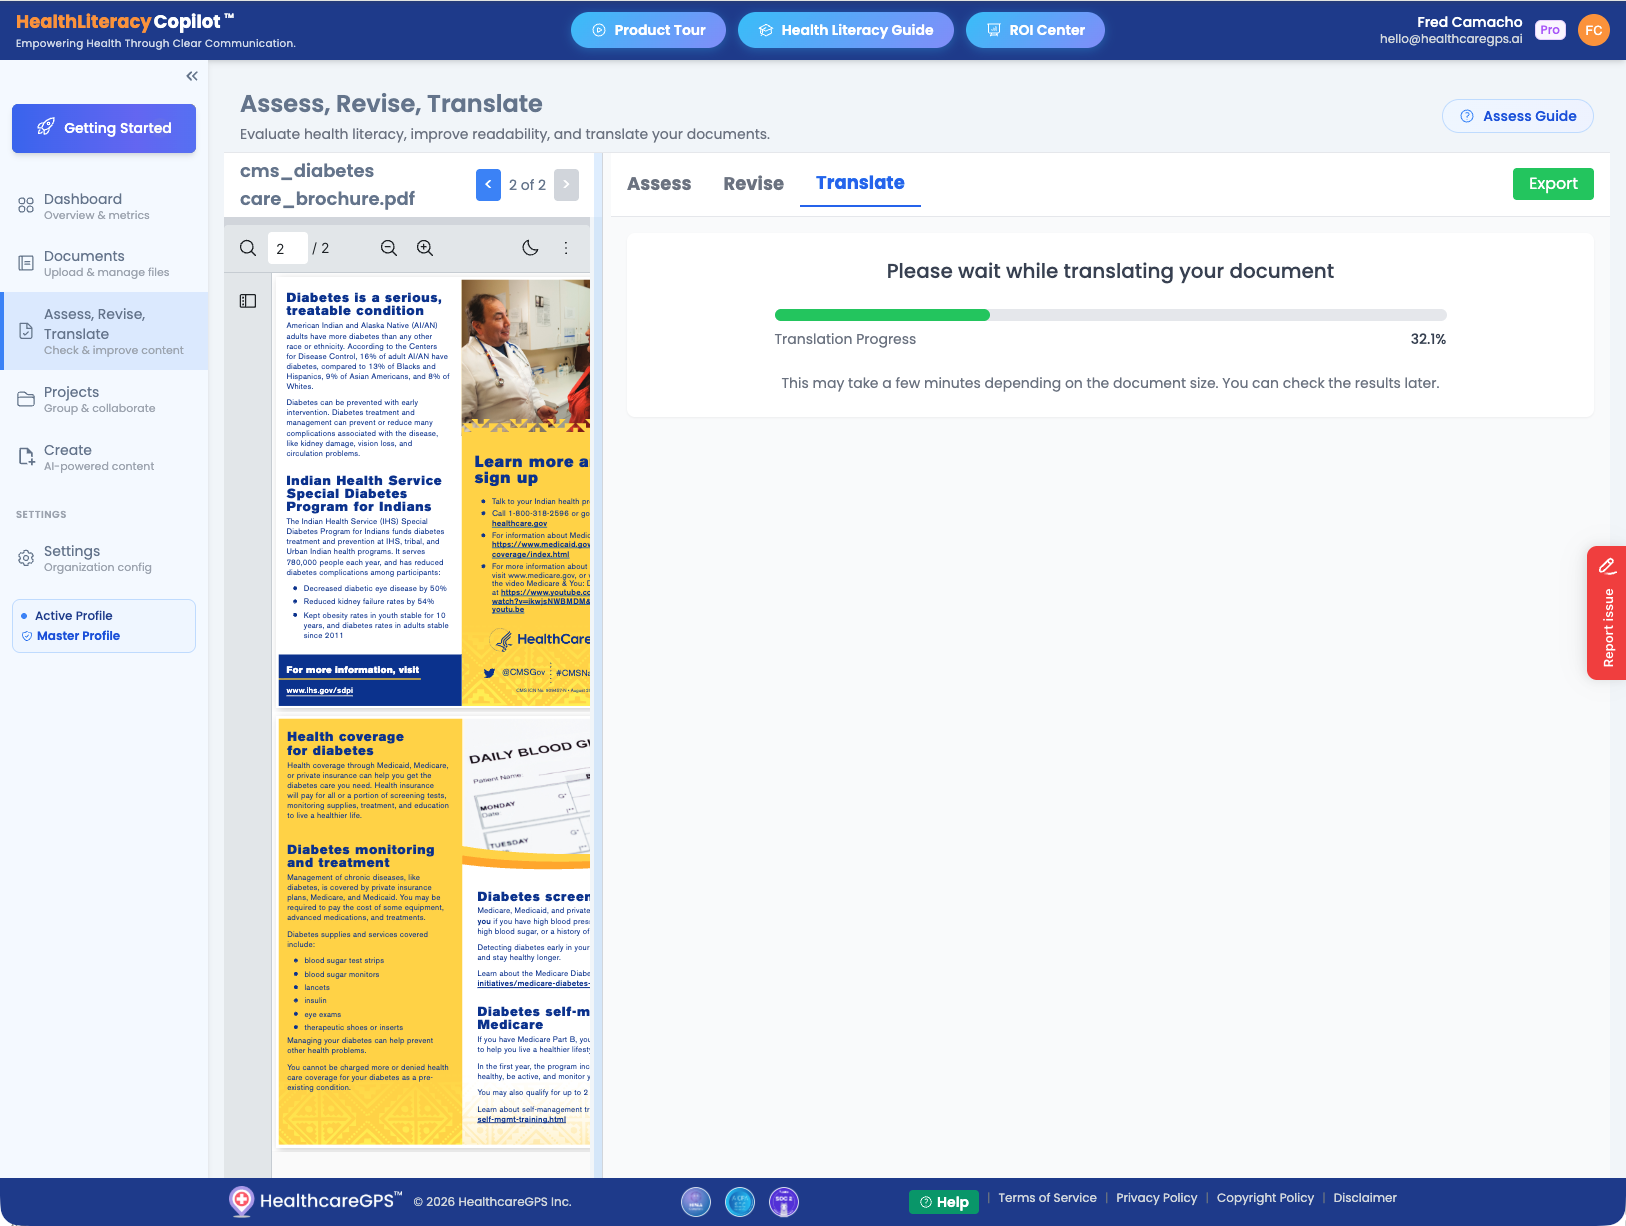
Translation In Progress
Select your target language and click "Translate". The AI translates your approved content while maintaining health literacy best practices for the target language.
Review Translations
View the Approved English Text alongside the Translated Text. Each translation includes an explanation of linguistic choices, cultural adaptations, and terminology decisions. You can edit or suggest changes to any section.
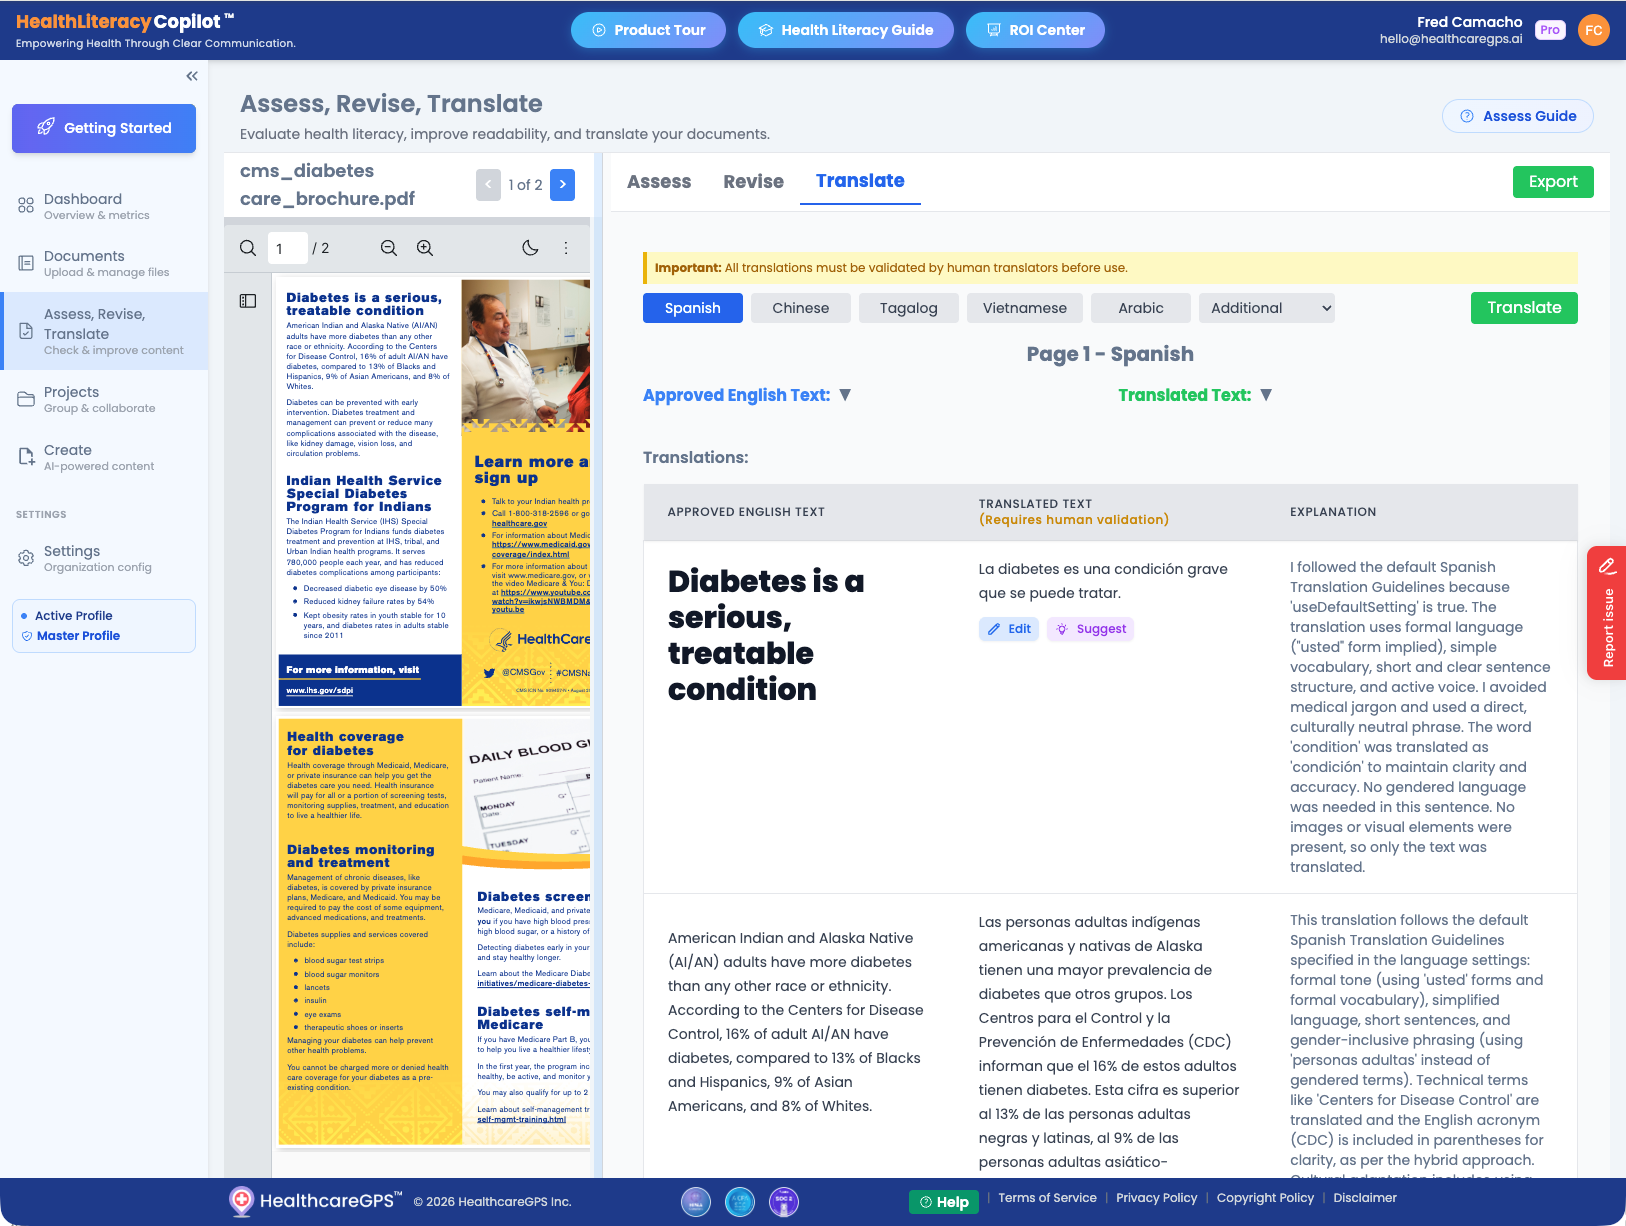
Important: All translations must be validated by human translators before use. The AI translation is a starting point to accelerate the process.
Complete
Review & Export
Once your document has been assessed, revised, and translated, head back to the Documents page to see the completed results. Export your work in the format you need.
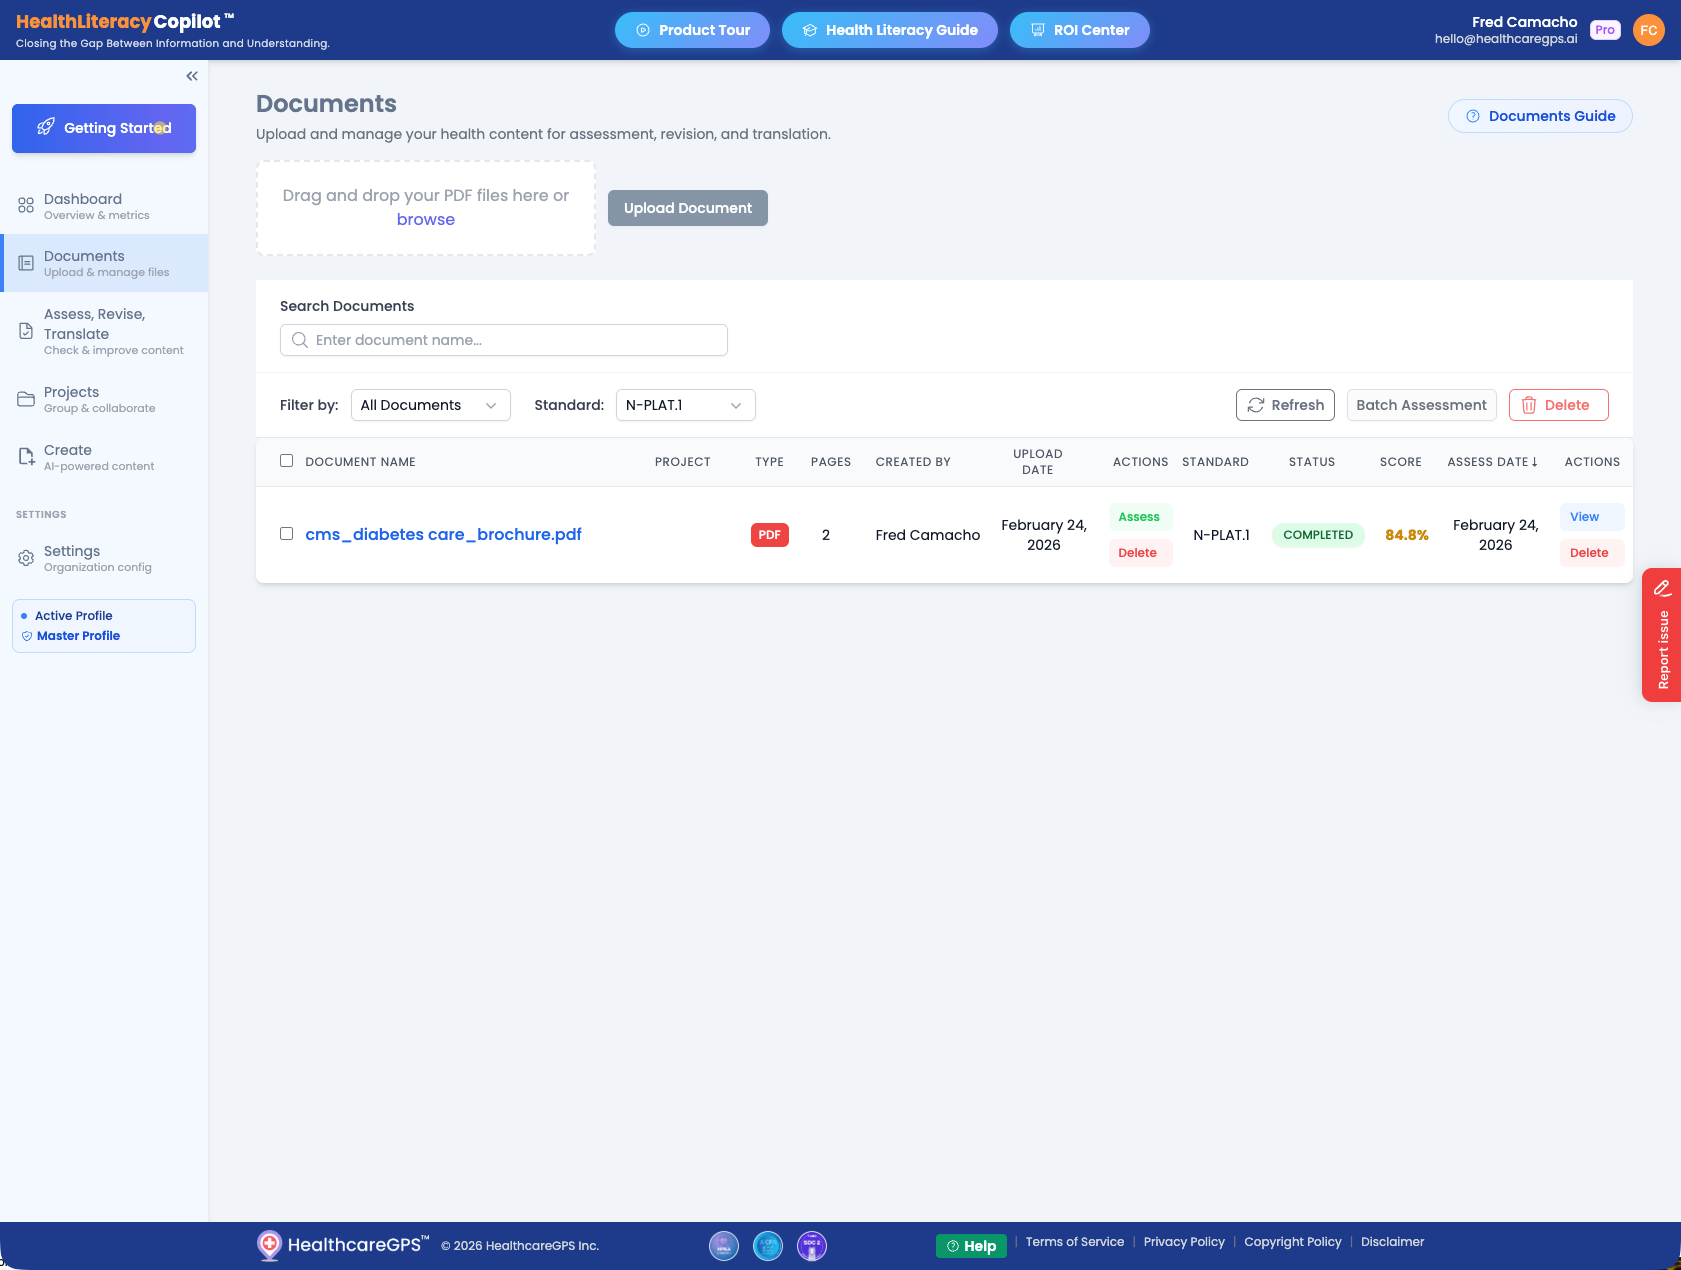
View Completed Assessment
Your document now shows a COMPLETED status with a health literacy score. In this example, the document scored 84.8% against the N-PLAT standard.
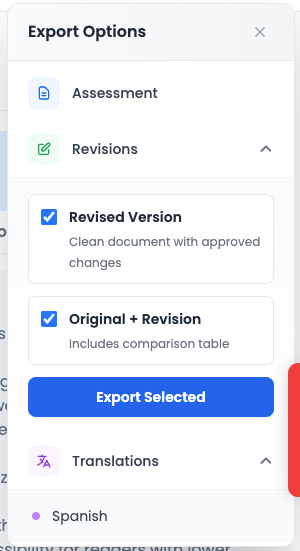
Export Your Work
Click "Export" to download your results. Choose from multiple export options:
- Assessment — Full assessment report with scores and criteria
- Revised Version — Clean document with all approved changes
- Original + Revision — Side-by-side comparison table
- Translations — Translated content by language
Need Help?
In-App Help
Look for the green "Help" button at the bottom of every page in the User Portal.
In-App Guides
Each section of the User Portal has a dedicated guide button (e.g., "Documents Guide", "Assess Guide") in the top-right corner for context-specific help.
Ready to Get Started?
Transform your health communications with AI-powered assessment, revision, and translation.